As the days get longer and visions of vibrant green dance in my mind, I can’t help but think of the upcoming St. Patrick’s Day celebrations. This year, I wanted to embrace the spirit of the season with a treat that’s as festive as it is delicious: Oreo Balls. You might be skeptical at first—who knew mixing cookies and cream cheese could create such magic? But trust me, these little bites of heaven pack a punch of flavor while still being incredibly easy to whip up.
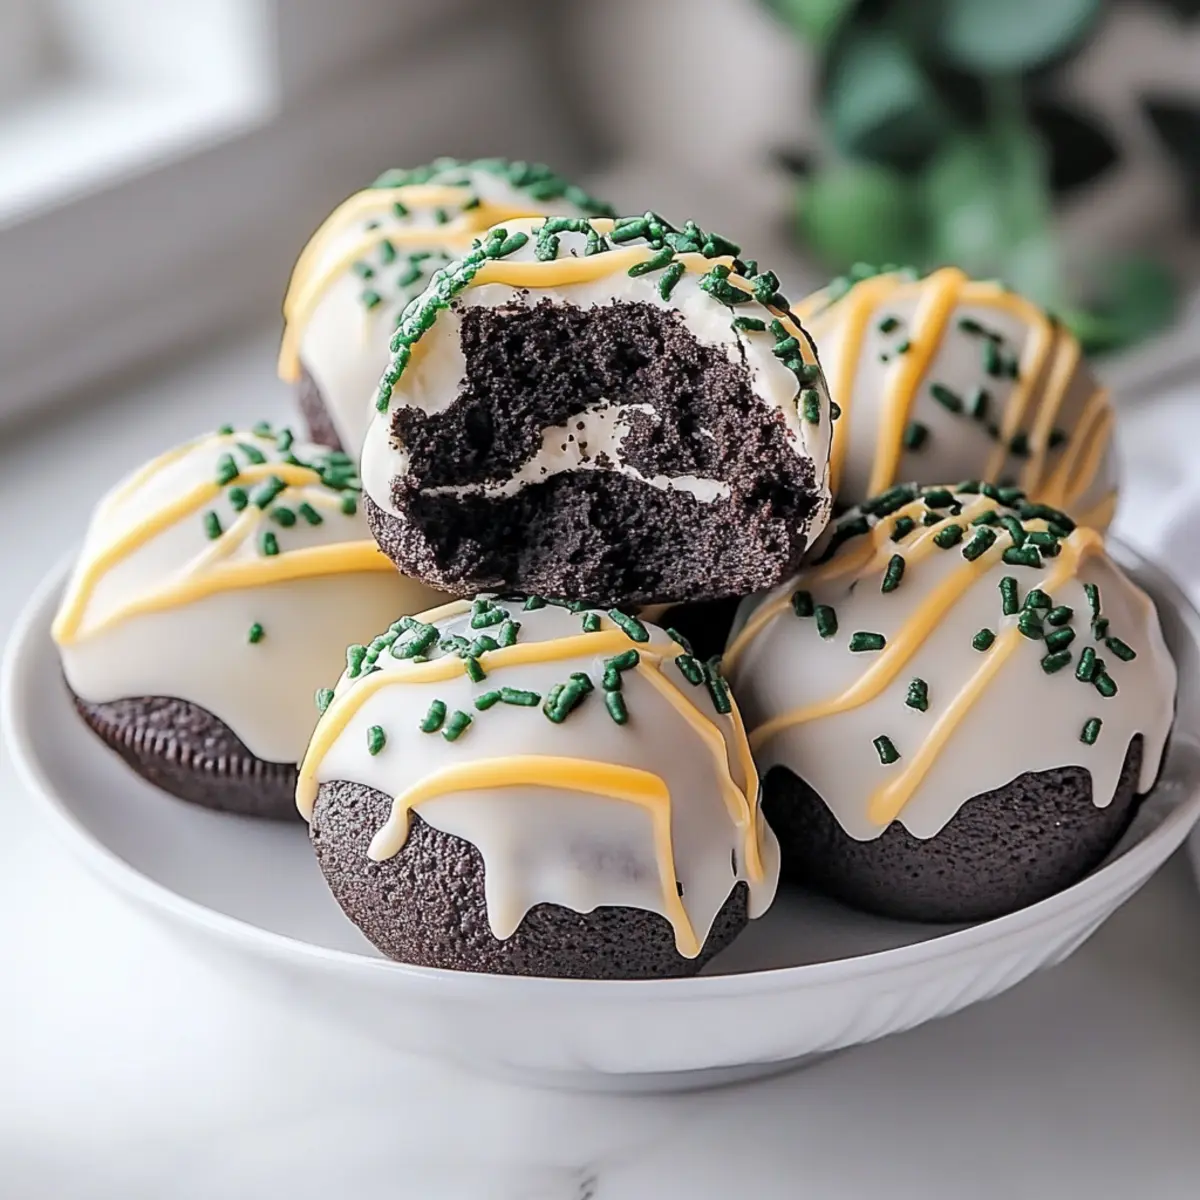
I stumbled across this recipe during a week when the mundane took over my kitchen. In less than an hour, I had decadent, colorful treats ready to share with friends and family. Perfectly sweet, a little tangy, and blanketed in a delightful green candy coating, these Oreo Balls are sure to become a staple in your festivities, whether you’re throwing a party or simply craving a homemade bite of joy. Let’s dive into how you can make these crowd-pleasers yourself!
Why You'll Love This Oreo Balls
- These Oreo Balls are incredibly easy to make, allowing even the novice baker to impress friends and family with a delicious treat.
- The rich flavor combination of Oreo cookies and cream cheese provides a delightful taste experience that will keep everyone coming back for more.
- With their vibrant green color and festive appearance, these treats are visually stunning and the perfect addition to any celebration.
- Plus, you can customize the toppings or adjust the flavor to make them your own, ensuring they fit any occasion.
Oreo Balls Ingredients
Get ready to create these delightful treats!
For the Oreo Mixture
• Oreo cookies – crushed into fine crumbs; they form the rich base for the Oreo Balls.
• Cream cheese – softened to ensure easy mixing; it adds a creamy texture that binds the cookies together.
For the Coating
• Green candy melts – melted smooth; they provide that festive color and sweet coating to your Oreo Balls.
• Sprinkles (optional) – for added flair; they make your Oreo Balls pop visually and bring a bit of extra joy to each bite!

How to Make Oreo Balls
-
Crush Oreos: Start by crushing the Oreo cookies into fine crumbs using a food processor or a rolling pin. Aim for a sandy texture, which should only take a couple of minutes.
-
Mix Together: In a large bowl, combine the crushed Oreos with softened cream cheese. Mix until well blended, resembling a thick cookie dough that holds together nicely.
-
Form Balls: Roll the Oreo mixture into 1-inch balls and place them on a lined baking sheet. Chill the balls in the fridge for about 30 minutes until set and firm to the touch.
-
Melt Candy Coating: While the balls chill, melt the green candy melts according to package instructions. Stir until the mixture is smooth and ready for dipping.
-
Dip Oreo Balls: Carefully dip each chilled ball into the melted coating, ensuring they are fully covered. Allow any excess chocolate to drip off before placing them back on the lined sheet.
-
Add Sprinkles: If you fancy, sprinkle your favorite colorful sprinkles onto each ball while the coating is still wet. Once decorated, return the Oreo Balls to the fridge until the coating is completely hardened.
Optional: Drizzle with white chocolate for an extra touch!
Exact quantities are listed in the recipe card below.
What to Serve with Oreo Balls?
As you prepare for your festive gathering, let’s explore delightful accompaniments that will elevate your treat experience.
-
Mint Chocolate Ice Cream: The refreshing mint flavors harmonize beautifully with the chocolatey richness of Oreo Balls, creating a delightful balance.
-
Coffee or Espresso: A robust cup of coffee or a shot of espresso cuts the sweetness, making a perfect pairing for these indulgent bites.
-
Fruit Salad: Fresh mixed berries or citrus slices add a bright, juicy contrast, balancing the rich flavors with a pop of freshness.
-
Sweet Wine: Pairing with a light, sweet wine like Moscato enhances the playful taste of the Oreo Balls, adding sophistication to your dessert table.
-
Chocolate Milkshake: For the ultimate indulgence, a creamy chocolate milkshake complements the Oreo flavor while providing a nostalgic touch.
-
Caramel Dip: Drizzling a bit of warm caramel on top of your Oreo Balls introduces a luscious element that will make them even more irresistible.
Imagine enjoying these delectable combinations as you share laughter and joy with loved ones. Each pairing enhances the rich experience of Oreo Balls, making your celebration truly memorable.
How to Store and Freeze Oreo Balls
Fridge: Store your Oreo Balls in an airtight container in the fridge for up to 1 week. This keeps them fresh while maintaining that delightful creamy texture.
Freezer: If you want to enjoy these treats later, freeze the Oreo Balls in a single layer on a baking sheet, then transfer to an airtight container for up to 3 months.
Reheating: When you’re ready to enjoy frozen Oreo Balls, let them thaw in the fridge for a few hours or overnight, so they retain their delightful position of creamy goodness.
Serving: Before serving, if you like, you can refresh the appearance by adding a sprinkle of colorful decoration on top to make them pop again!
Oreo Balls Variations
Feel free to let your creativity shine and customize these Oreo Balls to suit your taste buds!
-
Nutty Delight: Add 1/2 cup of finely chopped nuts to the Oreo mixture for a crunchy texture that complements the creamy filling. Pecans or walnuts work especially well.
-
Chocolate Lovers: Swap the green candy melts for dark or white chocolate for a richer flavor experience. There’s something heavenly about that luscious chocolate coverage.
-
Minty Fresh: Incorporate 1/2 teaspoon of peppermint extract into the Oreo mixture for a refreshing twist. This flavor will take your Oreo Balls instantly to a new level of delight!
-
Fruit Infusion: Mix in 1/4 cup of dried fruit, like cranberries or cherries, for a chewy element that adds a fruity burst—bringing a lovely contrast to the sweetness.
-
Spice it Up: Add a pinch of cinnamon or a dash of sea salt to the mixture for a subtle warmth and a balance of flavors that bring out the Oreo goodness.
-
Holiday Cheer: For festive flair, use seasonal candy melts instead of green ones—try vibrant red or blue for different celebrations! They’ll catch the eye and taste just as delightful.
-
Dairy-Free: Replace cream cheese with a dairy-free cream cheese alternative and use dairy-free chocolate melts. A perfect adaptation for those with lactose sensitivities!
-
Mini Oreo Balls: For bite-sized treats, roll the mixture into smaller balls. They’re perfect for gatherings or simply to satisfy your sweet tooth in one delectable bite!
Make Ahead Options
These Oreo Balls are perfect for meal prep enthusiasts! You can prepare the Oreo mixture (crushed cookies and cream cheese combined) up to 24 hours in advance, storing it tightly covered in the refrigerator to maintain freshness. Furthermore, once you roll the balls, they can be chilled for the same duration, ensuring they are firm and ready for coating. When you’re ready to finish, simply melt the green candy melts and dip each ball in the coating, allowing them to set before serving. This makes your celebrations stress-free and gives you more time to enjoy the festivities with family and friends, while still ensuring these treats are just as delicious!
Chef's Helpful Tips
- For the perfect Oreo Balls, ensure that your cream cheese is fully softened to prevent lumps and achieve a smoother mixture.
- When crushing the Oreos, aim for a fine crumb texture to ensure they bind well with the cream cheese.
- When rolling your balls, remember to keep them uniform in size for even coating and presentation.
- Chill the balls for the full 30 minutes to allow them to firm up properly before dipping for a smooth finish.
Oreo Balls Recipe FAQs
How do I choose the best Oreos for this recipe?
Absolutely! When selecting Oreos, go for the classic variety for that perfect balance of chocolate and cream. If you’re feeling adventurous, you can also use flavored Oreos like mint or peanut butter for a unique twist that adds character to your Oreo Balls.
How should I store leftover Oreo Balls?
Very simply! Place your Oreo Balls in an airtight container and keep them in the fridge for up to 1 week. This helps retain their creamy texture and delightful flavor. If you notice any dark spots, it’s best to consume them immediately to ensure you’re enjoying them at their freshest!
Can I freeze Oreo Balls for later?
Absolutely! If you plan to enjoy these treats later, freeze your Oreo Balls in a single layer on a baking sheet first to prevent sticking. Once they’re firm, transfer them to an airtight container or freezer bag. They’ll last up to 3 months in the freezer. When you’re ready to enjoy, just let them thaw in the fridge for a few hours or overnight.
What should I do if my coating is too thick?
No worries! If you find your melted green candy melts are too thick to dip the Oreo Balls easily, try adding a teaspoon of vegetable oil or shortening to the melted candy. This will help achieve a smoother consistency for easier dipping. If your coating isn’t setting properly, ensure that your Oreo Balls are chilled thoroughly before dipping.
Are these Oreo Balls safe for dogs or pets?
It’s important to note that chocolate, including the kind used in Oreos, can be toxic to dogs. So, while our delightful Oreo Balls are perfect for human enjoyment, it’s best to keep them away from our furry friends. Instead, consider making dog-safe treats with pet-approved ingredients!
Can I substitute cream cheese for a dairy-free option?
Yes, you can! For a dairy-free alternative, look for vegan cream cheese options available at many grocery stores. Just make sure to check the ingredient list to ensure it suits your dietary needs. This way, everyone can enjoy the magic of Oreo Balls!
Oreo Balls
Ingredients
Equipment
Method
- Start by crushing the Oreo cookies into fine crumbs using a food processor or a rolling pin.
- In a large bowl, combine the crushed Oreos with softened cream cheese. Mix until well blended.
- Roll the Oreo mixture into 1-inch balls and place them on a lined baking sheet.
- Chill the balls in the fridge for about 30 minutes until set and firm to the touch.
- While the balls chill, melt the green candy melts according to package instructions, stirring until smooth.
- Carefully dip each chilled ball into the melted coating, ensuring they are fully covered.
- If desired, sprinkle colorful sprinkles onto each ball while the coating is still wet.
- Return the Oreo Balls to the fridge until the coating is completely hardened.